.

Showing posts with label sewing for kids. Show all posts

geranium pattern testing


Rae is at it again with yet another fabulous children's pattern - the Geranium Dress - available now!  I had the pleasure of being a pattern tester and made a happy Christmas dress for Ruby.


The Geranium Dress pattern is very simple with some pick-and-choose variations, and has a Washi Dress feel (it even has options for that signature notched neckline).  I was able to cut an sew the whole thing in just a few hours.  My favorite part of the pattern is the faux cap sleeve because the bodice is just a front and back - no fussing with little sleeves.


The fabric is Yard Sale Confetti Dot (Dear Stella Design) in grass.  I like that it will be cute for a Christmas dress, but can be worn long after.

Ruby requested a bow be added, so I happily obliged.  To be honest, I didn't measure the fabric, just cut a big and small rectangle that looked about right and made a simple bow.  I hand-stitched the center of the bow to the dress and tacked down the top corners to keep them from falling out of place.

Ruby is a happy girl.  She has worn this dress three times in the past week.  And that, my friends, is a satisfying sew.


The Norah Dress Pattern Tour


When Hayley from Welcome to the Mouse House asked me to participate in her Norah Dress pattern tour, I was powerless to resist.  That collar!  I have a real weakness for patterns with a vintage vibe, and this one really hit the spot.  Plus, I love any pattern with a classic, simple shape.  This is a dress that will never go out of style.


Of course, the collar is the real show-stopper.  A cinched peter pan with ties?  I die.  When I was cutting the collar pattern piece, the scraps seemed like they would be just the perfect size and shape for a few pockets.  They are a bit tight up top, but Ruby can still get her hands inside, and the first thing she did was start loading them with treasures.  Plus, the pockets were a way for me to add more pink (at her request).

Fabrics used:  main print - Emily Herrick Technicolor in Kryptonite, collar - Essex Yarn Dyed Linen in black, lining - Kona Cotton (not sure of the color).


Ruby approved.


Until our little photo bomber came along.  Oh sure, it was funny at first, but then baby sister tried to steal too much of Ruby's thunder.  "These pictures are just of ME!" she said.


It wouldn't be a photo shoot without a few tears, right?


No tears were shed about the Norah Dress though.  It was a real winner.  I can't wait to sew up more versions for my girls (it works for knits, too!) ... let's just say I plan to copy Simple Simon's perfect yellow Norah tunic pretty much point by point.


Thanks, Hayley, for including me in your first pattern tour!  I'm a fan.  

Make a stop at all the blogs on the pattern tour, so you don't miss any of the wonderful versions of this pattern!


cozy car caddy tutorial

Thanks to everyone who voted for this project in the So You Think You're Crafty competition!  It was an exciting week.

Without further ado ...

Cozy Car Caddy Tutorial

Materials used:
two pieces of denim (17 x 10 inches and 17 x 6 inches)
one piece of Duck Cloth or other heavy fabric (17 x 10 inches)
gray and yellow felt (gray felt cut to 17 x 3 inches, yellow felt cut into seven 1 x 1/4 inch pieces
White Piping (two 17 inch pieces)
6" belting
1" Velcro
scrap fabric for applique
freezer paper, sponge brush, and acrylic paint
sewing machine and supplies


1.  Cut your fabric.  I used an old pair of jeans for the denim and duck cloth for the front.  Between the two heavy fabrics, it makes for a sturdy car caddy.
 
2.  Take your 17 x 6 inch piece of denim, fold it in half, and press.  This will be used for the car pockets.  Line up the raw edges of the denim with the bottom on the duck cloth and pin in place.  Sew along the bottom edge to secure.
 
3.  Sew vertical lines through all the fabric (3 layers, since the denim is folded in half), spacing the lines 2.75 inches apart.  Be sure to back stitch at the top and bottom.  If your child is especially rough on pockets, you may consider going over each line a second time.
 
4.  Sew your road piece centered in the top half of the duck cloth.  Pin the road dashes in place and sew around each dash using a coordinating thread.  Set the duck cloth aside.

5.  Add a car applique to the denim backing.  Center the car in the bottom half of the denim (see photo below).  When the caddy is folded together, the top half of the denim will be inside.
I used scrap cotton fabric for the car body and felt for the wheels.  You can use a fusible web like Wonder Under to hold your applique in place.  I was all out, so I just pinned and sewed. 
 
6.  Add decorative piping to the top and bottom of the denim backing.  Actually, add the piping all the way around as well ... I only had enough on hand for the top and bottom.  ;)
Line up the raw edge of the piping with the raw edge of the denim.  Pin in place and sew in place
along the existing stitch line on the piping.

7.  Pin the 6 inch piece of belting to the denim fabric, again lining it up centered on the edge of the bottom half of the denim piece (see photo above).  Leave about 1/4 to 1/2 inch overhang, so it will be enclosed between the denim and duck cloth layers when they are sewn together.  Stitch the belting in place using about a 1/4 inch seam (go over it a few times for extra strength)

I forgot to take a few pictures at this point ... bear with me.

8.  I added my velcro pieces last, but now would actually be a better time to do it.  Sew one side of the velcro to the end of your belting strap, and the other piece in the center of your car applique.

9.  Lay the denim piece and the duck cloth piece on top of each other, right sides facing together, and pin.  Sew around the edges using a 1/4 inch seam (try to follow the seam of the piping along the top and bottom).  Leave about a 3 inch gap for turning the caddy right side out.

10.  Turn the caddy right side out and pin the opening closed.  Sew around the entire outside edge again, closing the opening.  Go slowly around the bottom corners - all that denim gets thick.

11.  Fold the caddy in half horizontally and make a crease.  Sew a seam, following the crease, down the middle of the caddy (between the pockets and the road - see the final product photo for seam placement).  This will make the caddy easier to fold up.
 
12.  Using the templates found at the end of this post, cut the numbers out of freezer paper.  If you've never done freezer paper stenciling, you can find easy instructions at Angry Chicken (and everywhere else online - do a google search and I promise you'll find tons of help).

I sponged 3 light layers of white acrylic paint for my numbers (let each layer dry before applying another).

Fill your pockets with matchbox cars, and you are ready to roll.


Here's how it folds:  Fold the caddy in half so the road meets the pockets.  Then fold in thirds.  Wrap the strap around the front and velcro closed.


Enjoy!

p.s.  This project is similar to Sharla's Car Cozie at My Little Gems, who I have just recently gotten acquainted with.  If you plan to make this project, you should check out her tutorial as well, since they are different and you might like her construction better. 

Also, check out this awesome car caddy/crayon roll combo project at Create Studio.  Love it!

post signature

polka dot elephant

It was another craftacular evening at my house tonight. The secret Christmas crafts are moving right along, I packaged up my ornaments for the ornament swap, and I made this little polka dot elephant. Cute, no?

yellow + polka dots = ultra cheery

I dug up the same pattern from the last time I made one of these guys.

Is it weird that I don't put eyes on my elephants? I like them better without.

It got bundled up with the shoes and some burp cloths for a former co-worker. I hope she likes it!

I packaged it up in some fun new wrapping paper. Again with the polka dots - my new craze.

dolly stocking stuffer

So once there was this birthday party we were going to, and I thought, hey!  I'll make something.  But things got busy (as they are wont to do) and I didn't make the present.  So I thought, don't worry, self!  Just go to the store in the morning and buy something.  Well, in the morning it was pouring rain, and I don't like when my feet get wet.  So two hours before the party, I made this little doll:


I even made a hot breakfast for my kids in the middle of that time, so it actually took less than two hours.

The point of this post is that Black Apple dolls are super cute, super fast to make, and would make an awesome stocking stuffer.  One year I made seven.  There is even a free pattern!  Add extra seam allowance to the arms and legs, or turning them out will drive you bonkers.

The end.  Have a great weekend!


Cora's birthday carnival brunch


Baby Cora just turned two!  I guess that means she is not a baby anymore ... but we can just go on pretending, right?  The carnival theme came about because 1) when Cora arrived, our lives turned into kind of a three ring circus, and 2) I really wanted to reuse those decorations from Oscar's school carnival.  :) 


Of course, I used my favorite tool, Silhouette CAMEO for most of the decorations (banners, labels, vinyl, food picks, etc).  There are a few days left to enter the giveaway, and your odds are pretty good!  Also, I'll be posting the Black Friday deals on Thanksgiving day this year, so watch for that.  This sale is going to be the best they've ever offered, so you won't want to miss it.


I have to say, serving brunch was the easiest party food yet.  We skipped the cake all together and just served mini-doughnuts.


 For the rest of the spread, we had mini quiche, croissants, sausage, tiny yogurt cups, little pancake stacks, and apple fritter bread (which is crazy delicious, and you should totally try the recipe!).


The pancakes were my favorite.


But you know what was really my favorite from the party?  This girl.  She is a total nutter, and we love her to bits.


I made her a Geranium Tunic using the Children on Parade fabric by Sarah Jane.  I've been hanging onto it for a while, so I don't know how easy it is to find now.  It is one of my favorite fabrics ever!


So all it all, it was just a really fun morning where we ate ourselves sick and clowned around.


 Happy birthday, Cora!


birthday shirt, a new template, and updates


Last night I played, "how complicated can I make a simple project?"  Using Dana's 90-minute shirt tutorial, I sewed a birthday shirt for Oscar's friend (happy birthday, Audrey!).  Then I appliqued the cupcake, hand-sewed the crocheted lace trim, and used my Silhouette cutter to add the text.  Yowza.  I think it's cute.

Here's a copy of the cupcake template I sketched out (right click to save the image to your computer.  re-size and print as needed):

Advent Sew-Along
I'm so excited that many of you want to join me for this project!  Here are the frequently asked questions so far:
1)  What kind of felt am I using?  I love Rainbow Classic felt, which is made of 100% eco-fi (polyester made from recycled post-consumer plastic bottles).  It is a good thickness, comes in gorgeous colors, and very economical - hence, my favorite non-wool felt. You can buy it in yardage at fabric.com, among other places.

I wish I had a big enough craft budget to use wool felt, but that is not reality for me.  If you are willing to spend some extra money and truly make an heirloom piece, I would definitely recommend using wool or wool-blend felt.

2)  When will I be posting about the advent calendar?  Look for updates and assignments every Wednesday!

Ruby Blessing Dress
My apologies for the wait on the Ruby Blessing Dress pattern and tutorial.  Tutorials take a long time to put together, and unfortunately birthdays, holidays, and real life just keep getting in the way.  It will be posted as soon as possible!

Have a lovely weekend!

ruby's wonder woman costume

Hello! You'll find me over at Lil Blue Boo today, sharing a bit more about Ruby's Halloween costume.

If you aren't already keeping up on Ashley's story, you'll want to check out her posts on her recent battle with cancer.  I've always admired Ashley's work, but even more I admire her positive attitude and tenacity.  She is truly an inspiration, and it sounds like things are finally turning around for the better.  Hurray! 

Keep fighting, Ashley!  We love you.

halloween costume parade

Happy Halloween!

We had such a fun time at Oscar's birthday party this weekend - I have tons of photos, but I still need to go through them, so I'll share party details later this week.

Meanwhile, want to see all of our costumes? 

I made Jared a quick and easy robot costume by covering a large cardboard box in silver duct tape and cutting a bunch of vinyl decals with my Silhouette machine.  He really hates dressing up for Halloween, but he was sweet to humor Oscar (and me) for the party.


You've already seen Oscar's pumpkin costume.  It was too hot on Saturday to stuff him full, but we might try that for trick or treating tonight.  He was such a happy birthday boy.  The ear-to-ear smiles he wore all night made all the party prep worth it.

I made a pregnant pumpkin shirt with a simple freezer paper stencil and the new Martha Stewart Glitter Paint.   Not an elaborate costume, I know, but it was about all I could muster and it made Oscar happy.  We felt like a pretty cute pair of pumpkins. 
Here's our happy gang all together.  Ruby was Wonder Woman, and I am thrilled with how her dress came out.   She even wore the accessories happily, which was a miracle.   I'll post more on her outfit later.

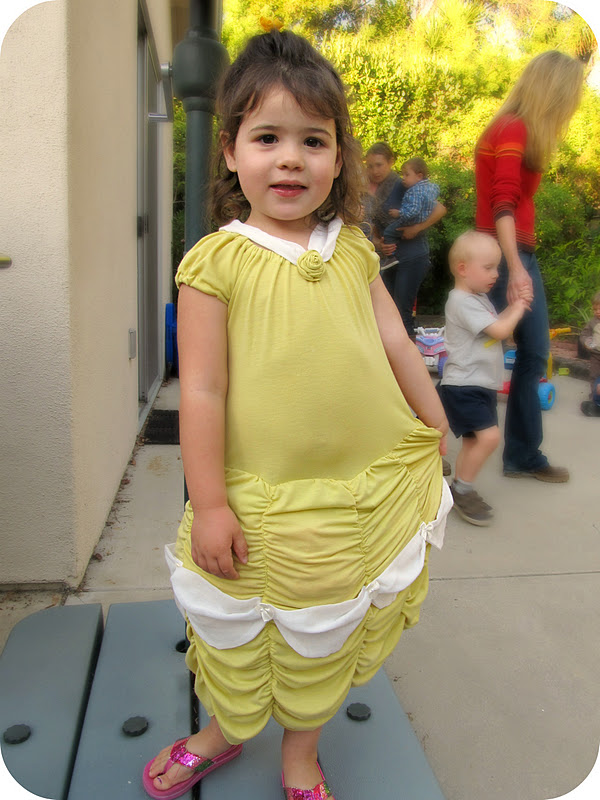
I also made the costume for our friend Audrey (Oscar's party companion), as her birthday present.  She loves Beauty and the Beast, so I made her a Belle dress using the Crafterhours tutorial again.  Her baby sister wore Ruby's old Belle dress, so we had two little princesses running/crawling around the party.


I hope you have a very happy and safe Halloween!  Don't make yourself sick with candy.  :)

Here are the kids' costumes from previous years:

2010:  Skeleton and Baby Aerobics Instructor
2009:  Bluebird