
.

Showing posts with label baby shower. Show all posts
Showing posts with label baby shower. Show all posts
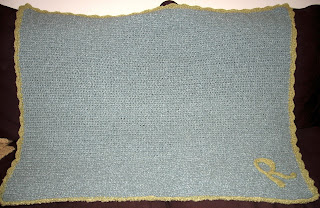
for a baby shower
I finished my friend's baby blanket today - now I can get back to the animal hat project. This is the first blanket I've ever added a monogram to, and I really like how it looks. Hopefully my friend will like it too!


vinyl wipes case template
You asked for it, so here it is ... a template to make your own vinyl-decorated wipes case.

 Supplies needed:
Prepare your vinyl - I used my Silhouette machine to cut a design (for Silhouette users, this design is called "Butterfly Floral Lace Square"). You could also buy pre-cut vinyl, cut it by hand, or substitute pretty contact paper (there are some great contact paper patterns out there these days). In my last post, a reader suggested using scrapbook paper and mod podging it to the wipes case. I've never tried this, but I'm sure it would work!
 Lay the template pieces on top of the vinyl, and using small pieces of scotch tape to hold them in place.

Cut around each template to get one back piece and two front pieces.
 Apply the vinyl to the wipes case, according to the material's instructions. If you are using an intricately cut design, I would strongly recommend using transfer paper.
I used some of the leftover scraps to apply little pieces to the center case flap.
Make sure you firmly adhere the vinyl to the case, smoothing down all corners, and you're done! Enjoy your one-of-a-kind wipes case.
And one more time ... here's another link for the wipes case template, in case you missed it. :)
Pin It
p.s. if you want to buy a vinyl decorated wipes case, check out Starr Designs on etsy. She makes a variety of decorated and personalized wipes cases, including this butterfly lace design.


- Hard plastic travel wipes case (my template is made to fit the Huggies brand cases)
- Cut vinyl, contact paper, or scrapbook paper and mod podge - I'm going to show you how I used the vinyl
- scotch tape
- scissors
- wipes case template
Prepare your vinyl - I used my Silhouette machine to cut a design (for Silhouette users, this design is called "Butterfly Floral Lace Square"). You could also buy pre-cut vinyl, cut it by hand, or substitute pretty contact paper (there are some great contact paper patterns out there these days). In my last post, a reader suggested using scrapbook paper and mod podging it to the wipes case. I've never tried this, but I'm sure it would work!


Cut around each template to get one back piece and two front pieces.

I used some of the leftover scraps to apply little pieces to the center case flap.
Make sure you firmly adhere the vinyl to the case, smoothing down all corners, and you're done! Enjoy your one-of-a-kind wipes case.
And one more time ... here's another link for the wipes case template, in case you missed it. :)
Pin It
p.s. if you want to buy a vinyl decorated wipes case, check out Starr Designs on etsy. She makes a variety of decorated and personalized wipes cases, including this butterfly lace design.
Teapot Sugar Cookies
One last post about this last baby shower and then I swear I'm done. I just wanted to post a few pictures of the teapot cookies because they were so cute. It was difficult to come up with designs for these because I am not good enough with the frosting tips to make them too intricate, but I didn't want them to be boring either. I settled on these four designs:
 Swirly lid teapot
 Polka dot teapot (this one felt very Alice in Wonderland to me)
 Flowered teapot
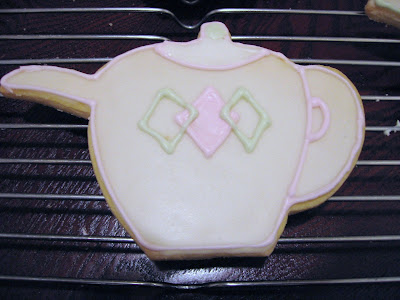 Argyle teapot

The polka dots and flowers were my favorites. I picked up a couple new cookie cutters while buying supplies for these as well as a giant frosting tip for cupcakes - can't wait to use them!
 Swirly lid teapot
 Polka dot teapot (this one felt very Alice in Wonderland to me)
 Flowered teapot
 Argyle teapot
The polka dots and flowers were my favorites. I picked up a couple new cookie cutters while buying supplies for these as well as a giant frosting tip for cupcakes - can't wait to use them!
an even easier diaper wipes case
There is no fooling you guys - most of you were spot on with your guesses about Ruby's costume in the last post. I'll wait until I've actually sewn something wearable before I make a reveal though Snow White or Wonder Woman? I'm sure you'll lose sleep over the anticipation. :)
This week I made a diaper wipes case for a friend's baby shower, but I wasn't in the mood for hot-gluing (every once and a while I like to save my fingertips).
 Instead, I got out my vinyl and cut an all-over pattern using my Silhouette machine. The front had the pattern only, fudged slightly on that center flap.
 The back has the same pattern repeated, and the mommy-to-be's last name in the center. I doubt she'll ever grab the wrong case at the playground now.
You don't need a Silhouette to make one of these (although that certainly makes the process quicker and more precise). Vinyl can always be cut by hand, and I think even Contact Paper would work well. I recommend using a premium or outdoor vinyl if you can get your hands on it, since the adhesive is stronger and hold up to more abuse.
I saved my template pieces for the front and back of the case, so let me know if you'd like me to post them!
UPDATE: You can find the wipes case template posted HERE.
This week I made a diaper wipes case for a friend's baby shower, but I wasn't in the mood for hot-gluing (every once and a while I like to save my fingertips).


You don't need a Silhouette to make one of these (although that certainly makes the process quicker and more precise). Vinyl can always be cut by hand, and I think even Contact Paper would work well. I recommend using a premium or outdoor vinyl if you can get your hands on it, since the adhesive is stronger and hold up to more abuse.
UPDATE: You can find the wipes case template posted HERE.
Diaper Cake Tutorial

UPDATE: check out my most recent diaper cake for some optional revisions to supplies and instructions.
I. Supplies Needed:

One large telescoping mailing tube (mine was 4 inches in diameter). I found mine at The Container Store.
You'll also need:
- a large piece of cardboard
- white butcher paper or wrapping paper
- doilies
- 2 bags clear rubber hair bands (think Goody) - about 100 bands
- large rubber bands, preferably white (I also found these at the container store - Can Bandz)
- a strong cardboard wrapping paper tube
- 2 packs of good-quality diapers, preferably plain white
- ribbon
- decorative paper
- safety pins
- a hot glue gun
- tape
- rubber cement
- sharp scissors
- flowers for decoration

First, roll all of your diapers. I bought one pack of pampers newborns (up to 10 lbs) and one pack of size one diapers (8-14 lbs) - approximately 45 diapers total. My friend is having twins, so I thought the smaller diapers would fit better. Roll the diapers with the pattern on the inside and secure around the middle with a clear rubber band. The open end of the diaper should be rolled to the inside.

 It will look like this. Continue until all the diapers are rolled and set aside.
II. The Diaper Cake Stand
Since I was planning to transport this diaper cake to work on the subway, I wanted it to be really sturdy. This method makes for a very solid cake.
1. Cut 3 large circles out of strong cardboard. For the largest tier, I traced a dinner plate. For the middle tier, I used a salad plate, and for the top tier, I traced a small bowl.

2. Trace each size again on white paper (I used wrapping paper so it had a nice shine). Cut the three circles out and glue (I used rubber cement) to the cardboard.

3. For a decorative edge, glue doilies around the circumference.

4. Now you are ready to start building the stand. First you will need to cut your mailing tube to the height of your rolled diapers. The larger sized diapers were about 4 inches tall when rolled, so I cut the outer (white) layer of the mailing tube to approximately 4 inches. Using a hot glue gun, glue the outer tube to the center of the decorative side of the lower tier.

5. Cut the inner (brown) tube to approximately 3-4 inches in length. Hot glue to the bottom (undecorated side) of the middle tier.


6. The middle tier will now slide into the bottom tier.

7. Repeat the process with the middle tier.

8. For the top tier, use a strong cardboard wrapping paper tube or something similar. Try to find a tube that does not easily bend (the inner tubes of saran wrap or reynolds wrap work well). Cut to the height of your smaller sized rolled diapers and hot glue it to the center of the decorated side of the top tier.

III. Adding the diapers
1. With the cake stand built, you are ready to start adding diapers. I disassembled my stand and added the diaper layers one tier at a time. Put the large rubber band around the mailing tube first, and it will secure the diapers as you add them. I used two layers of rolled diapers on the bottom tier.

2. The middle tier had a single row of rolled diapers.

3. The top tier also had a single row of rolled diapers.

4. I had extra diapers, so I put rolled diapers inside of the mailing tubes on the bottom and middle layers. This would also be a good place to hide other baby gifts (socks, receiving blankets, binkies, etc.) if you so choose. I also placed unrolled diapers around the mailing tubes to add few more. You can slide them into the middle there without removing the rolled layers.

III. Decoration
1. I taped green velum leaves to each of the cardboard bases to add a bit of interest to the edges

2. Use decorative ribbon to cover the rubberbands on each layer. I pinned one edge of the ribbon to the large white rubberband at the back of the diaper cake with a safety pin, so none of the diapers would be damaged. Then, I wrapped the ribbon around the diaper layer and overlapped it in the back, securing with hot glue (hopefully that makes sense). I love the look of double ribbon, but a single layer would do just as well.

3. Add a decorative cake topper. I used paper roses from a tutorial I saw at MarthaStewart.com. This trio of roses slid right into the opening of the wrapping paper tube in the top tier.

4. Place a few smaller flowers that match the topper on the lower layers. I just slid the wire stems in place under the cardboard base and used double sided tape on the bottom of the blossom to secure.

5. Sit back and enjoy all the oohs and ahhs at your baby shower.

Hopefully this tutorial was helpful! Sometimes I have a hard time putting crafty directions into words. This first-time diaper cake was a series of trial and error, but in the end had a great finished product. My favorite part of this diaper cake is that it is very sturdy, yet each of the tiers slide apart easily. It will easy for the mom-to-be to dissemble when it comes time to put those diapers to use, and the inner compartments are ideal for hiding additional gifts.
Enjoy!
Garden Tea Party Themed Baby Shower
The baby shower went really well yesterday. Here is a summary of all the crafty details:
 I used the tissue paper pom poms from Martha Stewart again. They are just too pretty and were almost mesmerizing to sit under - with the air conditioner going, they spun slowly overhead. It was a nice effect. :) I also make mini poms (half fluffed) as napkin rings - there are instructions in Martha's tutorial for this as well. I put the rolled napkins in the tea cup at each place setting. With the help of my friend Megan, I thrifted all over town to find teacups (silver tea set, which I didn't need, but couldn't resist). There are some nasty thrift stores in Manhattan, but I also found a few real gems.
 I also used Martha's pattern for a paper garland. You can use the .pdf of the alphabet in her tutorial, to customize and print your own (I enlarged the letters for mine) or you can buy a kit at Martha Stewart Crafts.

Ah ... my diaper cake. Perhaps my greatest crafting achievement? I think I am just pleased with myself because I didn't use someone else's instructions and came up with a pretty solid method. I photographed each step and will hopefully have the tutorial up by the end of the week.
My favorite parts of the diaper cake are the rose decorations. They look pretty real, right? Well, don't be fooled ... I made them out of coffee filters! Another great project on marthastewart.com. A woman named Cassie Chappell from Seattle showed Martha the process on her talk show, so there is a tutorial and an instructional video. You can check out her roses at www.mommymakesroses.com. I will post more on them later as well, but go to Martha for the detailed step-by-step instructions.

Keeping with the theme, I made a teapot cookie for each guest. They turned out cute, but were incredibly fragile (the spouts just snapped right off). I had 7 extras, but by the time they were iced and transported, I had just enough for an unbroken cookie per guest - phew. I'll post on the cookies later.
This baby shower was at work, and one of the benefits of working at a large law firm is we have an on-site caterer. It was great! The presentation was so nice, and the catering manager saw to every detail personally (he was setting up almost as long as I was!).


For hot beverage, they served an assortment of teas, coffee and hot chocolate (for me). :) It was so thick and chocolatey. Have you ever read the book, Chocolat? (It was also made into a movie). My bookclub girls will know what I am talking about, but it tasted precisely how I imagined Vianne Rocher's to taste. I had to dilute it a bit with water because it was so strong. Yum.
I forgot to take a photo of the cold beverage service, but they served pink lemonade and various sparkling ciders (my favorite was the apple-mango).
So, are your mouths watering? Flik (our in-house caterers) really outdid themselves. It was so nice to just pick the menus and let the pros do their thing.

All in all, a wonderful baby shower. It took me who knows how long to prepare and 4 1/2 hours to set up (I fluffed all the pom poms that morning in the office. Can you imagine me walking down Broadway trying to carry those things?). Everyone wanted to take one home, so the room came down in less than 5 minutes - that was kind of sad. But now I can start thinking of ideas for the next one ... another one of my managers is due in January.
 I used the tissue paper pom poms from Martha Stewart again. They are just too pretty and were almost mesmerizing to sit under - with the air conditioner going, they spun slowly overhead. It was a nice effect. :) I also make mini poms (half fluffed) as napkin rings - there are instructions in Martha's tutorial for this as well. I put the rolled napkins in the tea cup at each place setting. With the help of my friend Megan, I thrifted all over town to find teacups (silver tea set, which I didn't need, but couldn't resist). There are some nasty thrift stores in Manhattan, but I also found a few real gems.
 I also used Martha's pattern for a paper garland. You can use the .pdf of the alphabet in her tutorial, to customize and print your own (I enlarged the letters for mine) or you can buy a kit at Martha Stewart Crafts.
Ah ... my diaper cake. Perhaps my greatest crafting achievement? I think I am just pleased with myself because I didn't use someone else's instructions and came up with a pretty solid method. I photographed each step and will hopefully have the tutorial up by the end of the week.
My favorite parts of the diaper cake are the rose decorations. They look pretty real, right? Well, don't be fooled ... I made them out of coffee filters! Another great project on marthastewart.com. A woman named Cassie Chappell from Seattle showed Martha the process on her talk show, so there is a tutorial and an instructional video. You can check out her roses at www.mommymakesroses.com. I will post more on them later as well, but go to Martha for the detailed step-by-step instructions.

Keeping with the theme, I made a teapot cookie for each guest. They turned out cute, but were incredibly fragile (the spouts just snapped right off). I had 7 extras, but by the time they were iced and transported, I had just enough for an unbroken cookie per guest - phew. I'll post on the cookies later.
This baby shower was at work, and one of the benefits of working at a large law firm is we have an on-site caterer. It was great! The presentation was so nice, and the catering manager saw to every detail personally (he was setting up almost as long as I was!).

1. Turkey sandwiches with Dill Havarti on Seven Grain Bread
2. Roasted Red Peppers with Fresh Mozzarella and Pesto Spread on Foccacia
3. Truffle Risotto in Phyllo Dough
2. Roasted Red Peppers with Fresh Mozzarella and Pesto Spread on Foccacia
3. Truffle Risotto in Phyllo Dough

1. Chicken Cobb Salad in a Lettuce Cup
2. Piquant Pepper Stuffed with Fresh Mozzarella
3. Chicken Salad with Mango Salsa on Raisin Bread
2. Piquant Pepper Stuffed with Fresh Mozzarella
3. Chicken Salad with Mango Salsa on Raisin Bread

1. More of the Chicken Cobb Salad
2. Jumbo Lump Crab Cake with Dijon Remoulade
2. Jumbo Lump Crab Cake with Dijon Remoulade

For dessert:
1. Fresh Scones with Jam
2. Skewered Strawberries with Chocolate Fondue
3. Miniature Tartlets
4. Petit Fours
1. Fresh Scones with Jam
2. Skewered Strawberries with Chocolate Fondue
3. Miniature Tartlets
4. Petit Fours

For hot beverage, they served an assortment of teas, coffee and hot chocolate (for me). :) It was so thick and chocolatey. Have you ever read the book, Chocolat? (It was also made into a movie). My bookclub girls will know what I am talking about, but it tasted precisely how I imagined Vianne Rocher's to taste. I had to dilute it a bit with water because it was so strong. Yum.
I forgot to take a photo of the cold beverage service, but they served pink lemonade and various sparkling ciders (my favorite was the apple-mango).
So, are your mouths watering? Flik (our in-house caterers) really outdid themselves. It was so nice to just pick the menus and let the pros do their thing.

All in all, a wonderful baby shower. It took me who knows how long to prepare and 4 1/2 hours to set up (I fluffed all the pom poms that morning in the office. Can you imagine me walking down Broadway trying to carry those things?). Everyone wanted to take one home, so the room came down in less than 5 minutes - that was kind of sad. But now I can start thinking of ideas for the next one ... another one of my managers is due in January.
